 |
|||||||
Converting to Quicktime...
Once you have captured an HDV file (see capturing HDV) you are ready to convert the video to a Quicktime movie. If the file you want to convert isn't already loaded in the "Capture Browser", use the "Open Capture File" command from the menu:

Once you have loaded the file, you can use the "Preview Controller" to scrub through the timeline:

If you would like to adjust the size of the preview window, use the "Preview Window Size:" control button to change the size of the window:

There are four selections for this button. The first option "Don't Change" lets you set the window size. Once this is set the window will stay the same size regardless of the actual frame size of the video.
"Quarter size", "Half size", "Full size" adjust the preview window dynamically based on the size of the video.
The "Preview Controller" has four other buttons which are: "Play/Pause", "Set In Point", "Set Out Point", "Clear In/Out Points". Here's what each does:
"Set In Point"
This button marks the starting position to export from the HDV file to the Quicktime video. It is not completely frame accurate, but an approximation of where the export will start.
"Play/Pause"
This button will play back the video in the preview window. Depending on the speed of the computer and the preferences settings, the video will playback slower or faster than normal speed. The video's audio is not played back during the preview.
"Set Out Point"
This button marks the end point where the export will stop in the video timeline.
"Clear In/Out Points"
This button will remove any "in" or "out" points from the video timeline.
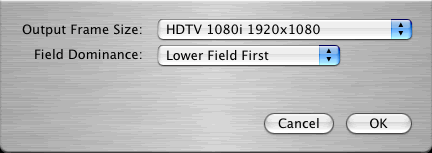
The first step in exporting video from HDV to Quicktime is to determine the frame size that you want to use. To do this open the HDVxDV preferences panel by selecting it from the menu:

The HDVxDV preferences panel will appear:

In the preferences panel, you can pick the output resolution under "Frame Size:".

Here's a brief explanation of the settings:
"Leave as is" - This setting will leave the HDV video at its native resolution.
"Multi-media Small 240x180" - Scale the video to 240x180 progressive.
"Multi-media Large 320x240" - Scale the video to 320x240 progressive.
"NTSC (4:3) 640x480" - Create interlaced video at 640x480.
"NTSC DV (3:2) 720x480" - Create standard DV sized interlaced video.
"CCIR 601 NTSC (40:27) 720x486" - This video is interlaced at 720x486.
"CCIR 601 PAL (5:4) 768x576" - Create standard PAL DV sized interlaced video.
"CCIR 601 PAL Sq. (4:3) 768x576" - Create interlaced video at 768x576.
"Multi-media VGA 800x600" - Create progressive video at 800x600.
"Multi-media xGA 1024x768" - Create progressive video at 1024x768.
"HDTV 720p..." - Create 16x9 progressive video at 1280x720.
"HDTV 1080i..." - Create 16x9 progressive video at 1920x1080.
"DVCPRO HD 720p60 ..." - Create 4:3 progressive video at 960x720.
"DVCPRO HD 1080i60 ..." Create 4:3 interlaced video at 1280x1080.
Select the size of the video that best fits your needs.
You may need to change the field ordering as well. Set the "Field Dominance" setting which best reflects your needs.
Once the preferences have been set, select one of the two export menu items. The first way to extract is the "Batch Export Movies...".

This option allows you to export all the movies in the "Capture Browser". This is the best setting if you want to convert a great deal of HDV files into Quicktime movies. You can load the same HDV file into the "Capture Browser" multiple times and mark different "in" and "out" points for each copy. This way you can convert selected scenes into Quicktime movies.
After selecting this option, the "Export panel" will appear:

This is where you select the video compression codec to use in the Quicktime movie. Here's a brief explanation of the options:

"DVC HD 1080i60" - This setting is for creating video with 1080 lines of resolution. It can be used for lower resolution video, as well.
"DVC HD 720p60" - This setting is matched for video with only 720 lines of resolution. If you use this codec with video that is a higher resolution, the quality will degrade.
"8 bit (4:2:2) Uncompressed" and "10 bit (4:2:2) Uncompressed" both of these settings require a large amount of hard drive space and Final Cut Pro must be installed on the system.
"DVC Pro SD NTSC" - This codec should only be used with video that has 480 lines of resolution. Using it with higher resolution video will substantially degrade the quality.
"iMovie NTSC" - This setting is exporting video to iMovie. When using this setting, the "Output Frame Size" in the preferences must be set to "720x480" in order for iMovie to import the video.
"iMovie PAL" - This setting is for exporting video to iMovie. When using this codec, the "Output Frame Size" in the preferences panel must be set to "720x576" in order for iMovie to import the video.
"Expert Settings" - This setting allows you to select any Quicktime codec that is installed on your computer.
After selecting the codec, HDVxDV will ask you for a folder to save the files to:

This folder is where all of the Quicktime movies will be saved to. The names for the individual files will be the same as the names of the capture files. If there are any duplicate capture files in the "Capture Browser", they will have a number appended to them.
After pressing the "Export" button, the progress panel will appear:

Once the conversion is complete, the progress panel will disappear and the Quicktime movie will be ready to use. You can press "Cancel" at any time during the conversion.
If you want to convert only one of the files that is in your "Capture Browser", use the "To Quicktime Movie..." selection in the menu. It works the same as the "Batch" method, but it will only convert one file.